This is often due to incorrect settings on your device or a broken network connection. Thankfully, it’s usually an easy process to fix if you can’t see other computers on a network. Windows, macOS, and Linux PCs all suffer from this problem from time to time, but here are some quick fixes you can use to resolve the problem.
Enabling Network Discovery on Windows 10
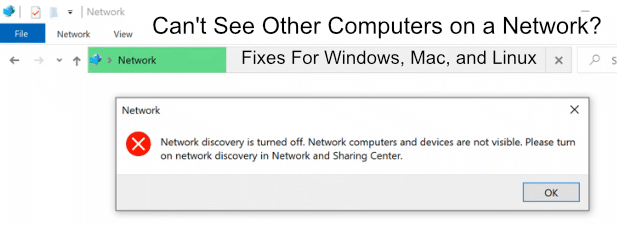
For most Windows users, the biggest cause of hidden PCs on a network is due to the network discovery settings on Windows. When this setting is disabled, your PC is hidden from the local network, and other PCs are hidden from you.
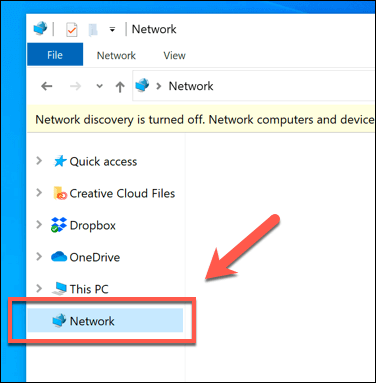
You can check whether network discovery is enabled by opening Windows File Explorer. In the Navigation Pane on the left, press the Network tab.
Windows will alert you immediately if network discovery is disabled. You can head to Settings > Network & Internet > Sharing Options > Turn on network discovery to re-enable this, but Windows will helpfully provide a shortcut to enable it at the top of the File Explorer window. Press the yellow bar that appears at the top to bring up a quick options menu.
In the options menu that appears, press Turn on network discovery and file sharing.
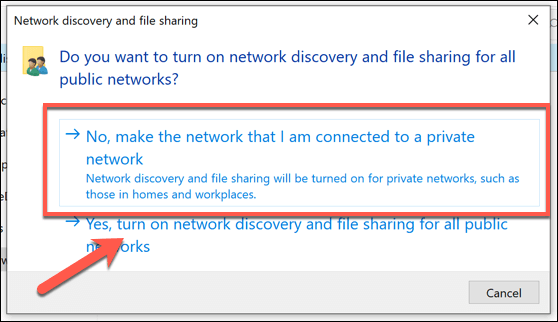
If your network is currently set as a public network, Windows will ask you if you want to switch your network to private, or otherwise allow network discovery on public networks. This isn’t usually advisable—if you’re on your own network, select the No, make the network that I am connected to a private network option instead.
Once network discovery has been enabled, you should be able to see other computers in the Networks tab—but only if those devices have network discovery enabled, too. You can also access devices directly by typing their IP address or hostname in the address bar at the top of the File Explorer window.
Configuring Your Firewall to Allow File and Printer Sharing
The Windows Firewall is designed to block unnecessary traffic to and from your PC. If network discovery is enabled, but you still can’t see other computers on a network, you may need to whitelist File and Printer Sharing in your firewall rules.
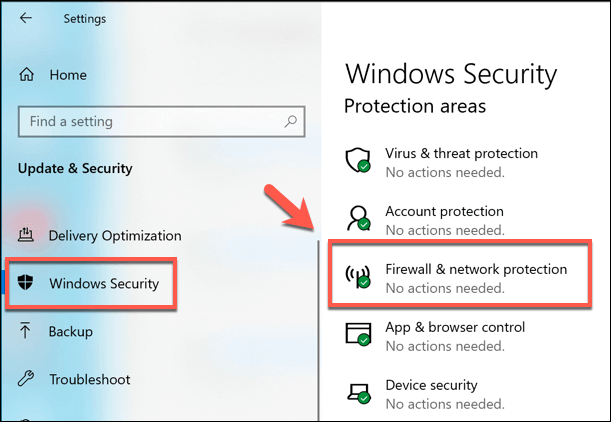
To do this, right-click the Windows Start menu and press Settings. In the Windows Settings menu, press Update & Security > Windows Security > Firewall & network protection.
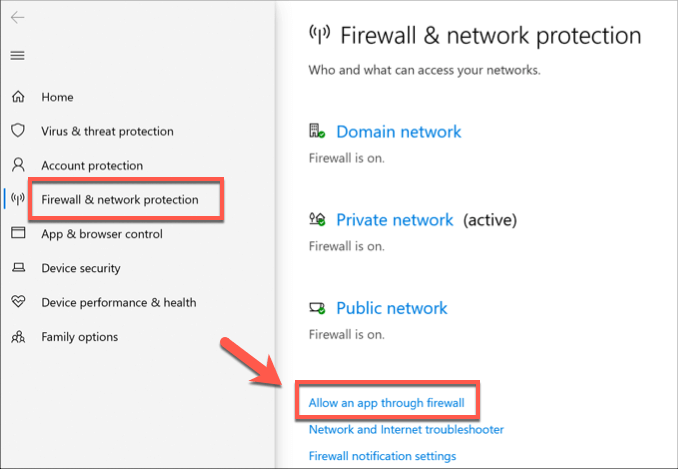
In the Firewall & network protection menu, click the Allow an app through firewall option.
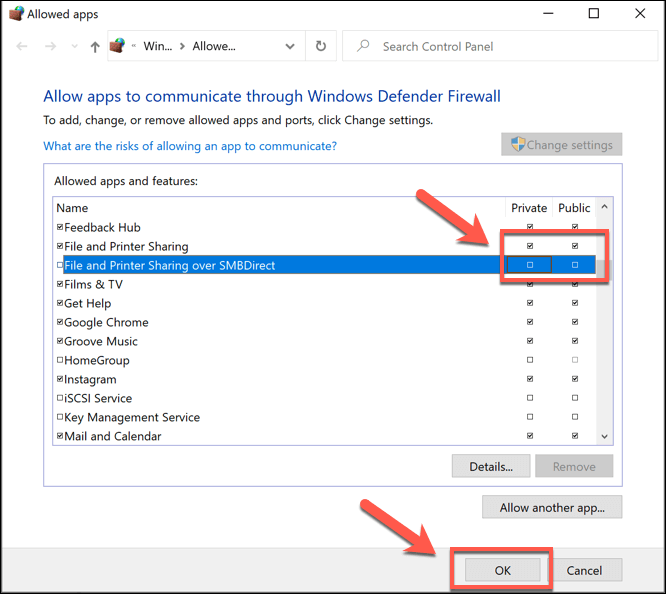
In the Allow apps to communicate through Windows Defender Firewall window, press Change Settings to allow access. Scroll through the list until you find the Fill and Printer Sharing and File and Printer Sharing over SMBDirect options and click the checkbox for each option under the Private column to allow this through the firewall. You can also enable the checkboxes under the Public column if you want to allow public networks access, but this isn’t recommended. Press OK to save once you’re done.
You’ll need to repeat this process for any other third-party firewalls you may be using, including a network firewall (if you’re using one).
Enabling the Computer Browser Service on Windows 10
This is unlikely to be the cause of your issues, but if you’re running out of software solutions to try, you should see if the Computer Browser system service is enabled and running on your PC. This is used by Windows to list local PCs on your network in File Explorer.
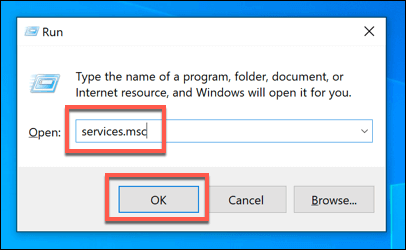
To start, press the Windows key + R on your keyboard. In the Run dialog box, type services.msc, then press OK to launch.
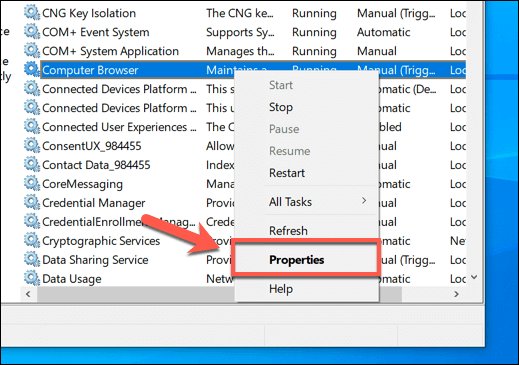
In the Services management console window, locate the Computer Browser service and look at the current status for it under the Status column. If the status is currently Stopped or Disabled, you’ll need to re-enable it—right-click and press the Properties option.
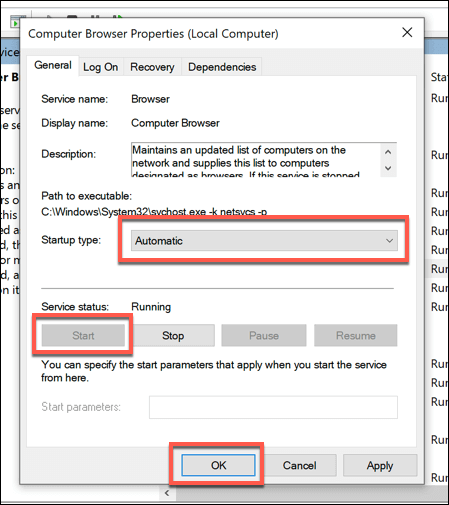
Click the Start button to enable it in the Computer Browser Properties window, then select Automatic under the Startup type drop-down menu to ensure it starts automatically in future. Press OK to save.
Checking Your Local Network Configuration
If you still can’t see other computers on a network, you’ll need to double-check if your PC is correctly connected to your local network. Run a physical check on your router cables if you’re on a wired network, and if you’re on a wireless network, make sure your connection to the wireless access point is active and stable. One way to check this is to use the ping command from a PowerShell or command line. This will allow you to see whether your PC is connected to your network correctly and can detect other local network devices, but to do so, you’ll need to know the local IP or hostname for another local PC.
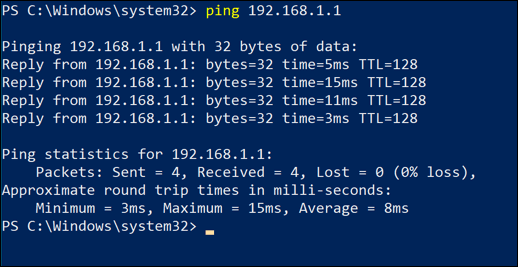
To use ping, right-click on the Windows Start menu and press Windows PowerShell or Windows PowerShell (Admin). From the PowerShell terminal, type ping x.x.x.x or ping hostname, replacing x.x.x.x and hostname with either a local IP address or PC hostname.
If the ping command responds with a reply, then a network connection issue shouldn’t be preventing you from seeing other computers on your network. This would likely suggest a software or network configuration issue elsewhere.
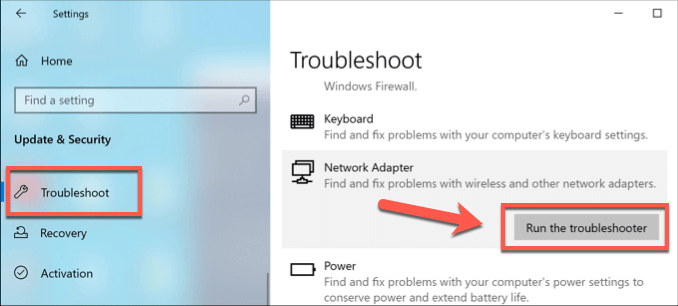
You can test your network configuration for problems in your Windows settings—right-click the Start menu and press Settings to access this. From there, press Update & Security > Troubleshoot > Network Adapter and click Run the Troubleshooter.
If Windows detects any problems with your network configuration, it will automatically attempt to fix them. This might detect, for instance, that a static IP address is being used for your network device—if this is set up incorrectly, you won’t be able to interact with other devices on your network.
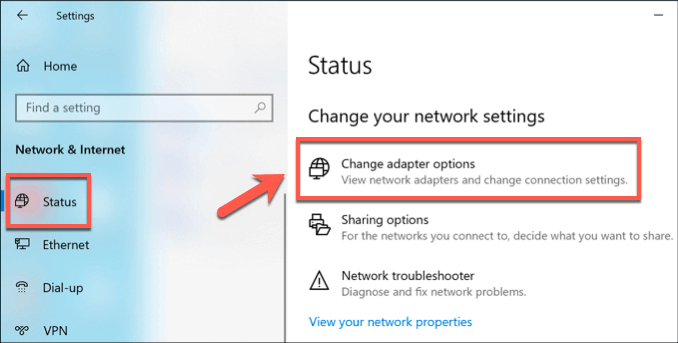
To change this, right-click the Start menu button and press Settings. From the Windows Settings menu, press Network & Internet > Status > Change adapter options.
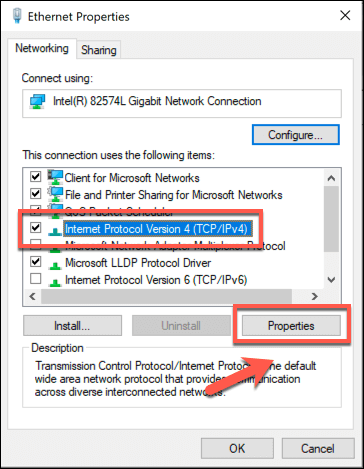
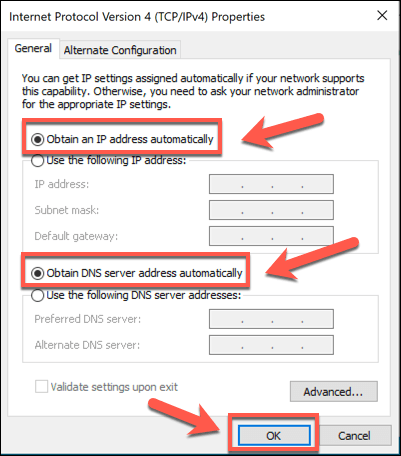
In the Network Connections menu, right-click on your network device and press Properties. In the Properties window, click Internet Protocol Version 4 (TCP/IPv4) and press Properties.
In the IPv4 Properties window, make sure that Obtain an IP address automatically and Obtain DNS server address automatically are selected and enabled, then press OK > Close to save.
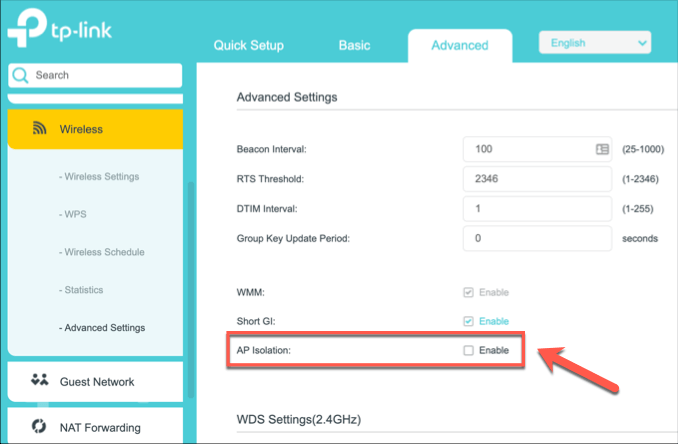
You might also find that the problem isn’t with your PC configuration, but with your network. For instance, a feature called wireless isolation (sometimes called client isolation or AP isolation) on some routers will hide wireless devices from each other on a local network, preventing you from connecting to them from your PC. You may need to consult the user manual for your wireless router to determine how to disable this feature, but you should be able to find it under your local router’s wireless settings.
How To See Other Computers On Network With macOS
Apple devices are usually very good at detecting other Apple devices, thanks to the Apple Bonjour networking service, and it can usually detect other Windows and Linux PCs, too. If you want to see other computers on macOS, you can do this by clicking the Network tab in the core macOS Finder app.
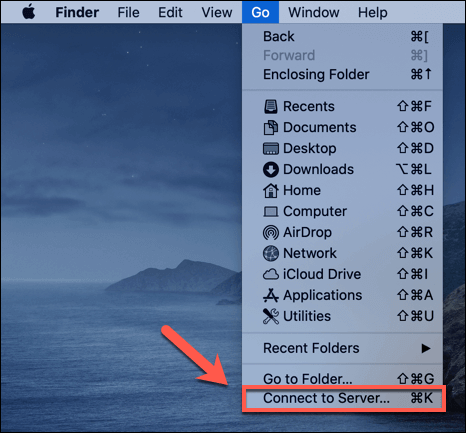
If you can’t see any other computers on your network at this point, you may need to connect to it manually. To do this, open the Finder app and press Go > Connect to Server.
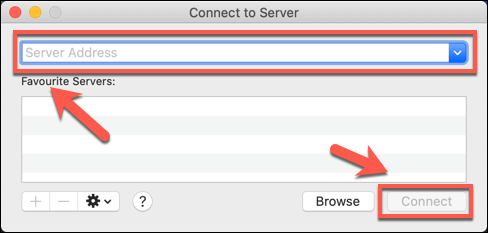
In the Connect to Server window, type the IP address or hostname for the PC you want to connect to in the Server Address box. Press Connect to connect to the server, following any on-screen instructions to provide the correct credentials to make the connection.
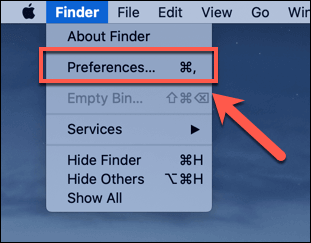
If you can’t see the network PC after making a direct connection, you’ll need to make sure the option to view it is enabled in Finder. To do this, press Finder > Preferences from the menu bar.
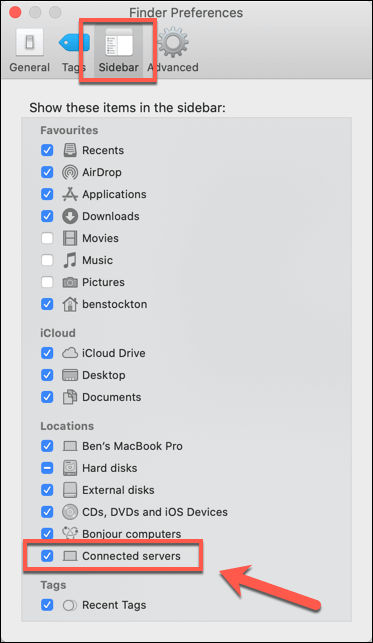
In the Finder Preferences window, make sure that the Connected servers checkbox is enabled in the Sidebar tab.
Once checked, you should be able to see a Connected servers tab in Finder, where your connected PC will be shown for you to access. If you can’t view or connect to another PC or Mac, or if no devices are visible in the Networks tab in Finder, it may be caused by a problem with your macOS network connection. You can double-check this by clicking the Apple menu > System Preferences > Network. In the Network settings menu, check your connection type in the left-hand menu—the icon next to your connection should be green. If it isn’t, you’ll need to run through some obvious checks (physical wiring, WiFi connectivity, etc) to restore your connection, then repeat the steps above.
How To See Other Computers On Linux
Linux software packages vary from distribution to distribution, so there’s no one-size-fits-all approach if you can’t see other computers on a network from a Linux PCs—at least with a graphical user interface. To check if your PC can see other devices, you can use the arp-scan network scanning tool to scan your network for devices instead. This will list all available devices on your network.
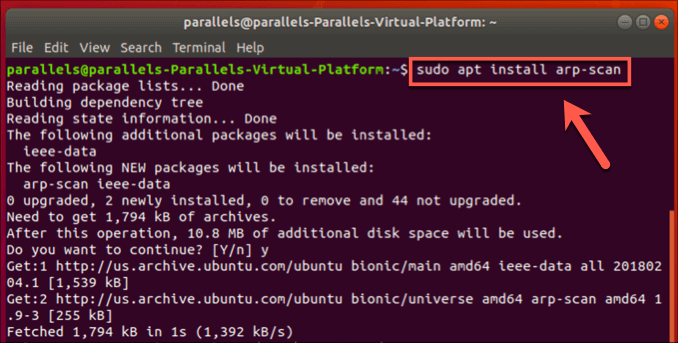
You’ll first need to install the arp-scan package to run this scan. On Ubuntu and Debian-based operating systems, you can do this by opening a terminal and typing sudo apt install arp-scan.
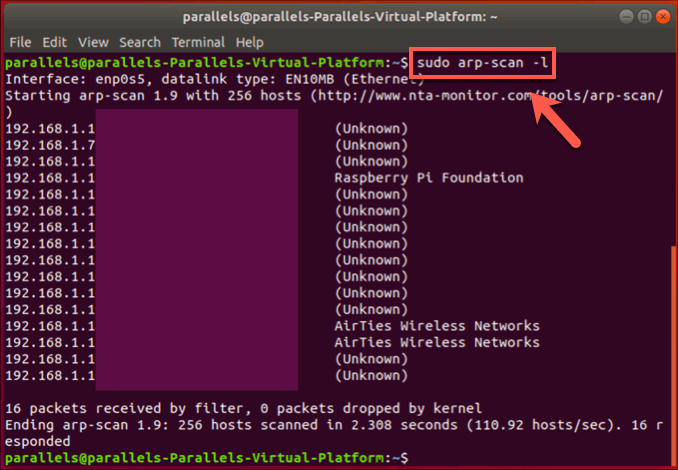
Once arp-scan is installed, type arp-scan -l in the terminal and press enter. If it doesn’t work, try sudo arp-scan -l instead.
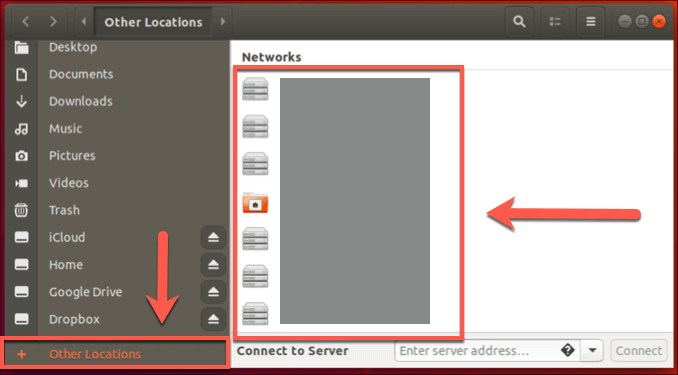
A list of available devices on your network will be listed, with IP addresses, MAC addresses, and device types shown. If this command works, then network discovery is possible from your Linux PC, and you should be able to view and connect to other PCs using your Linux distribution’s file management tool or by using the terminal. If it fails, it will likely indicate a problem with your overall network configuration or firewall. You can take the usual steps (physical checks and connection tests) to try to resolve these. If you’re using Ubuntu, you can quickly view and connect to detected network devices by opening the File Manager app and clicking the Other Locations tab.
Setting Up Your Network Correctly
As our fixes above show, there are quite a few ways to troubleshoot a network connection if you can’t see other computers on a network. Most problems can be resolved with an improved network setup, including checking your device is in a good position for WiFi or, if you’re using ethernet, that your wiring is correctly connected. If your WiFi connectivity is causing problems, switching to an all-wired network could resolve the problem over the long term. Ethernet is better than WiFi for certain situations—but it isn’t a miracle fix. Let us know your own tips and fixes for network problems in the comments below.



![]()
