Over time, however, this data can begin to fill up your available memory. The bigger the cache, the less free memory your PC has to perform other crucial tasks. Knowing how to clear the cache in Windows 10 could offer you an immediate speed boost if your PC is starting to run a little slow.
Restart Your PC
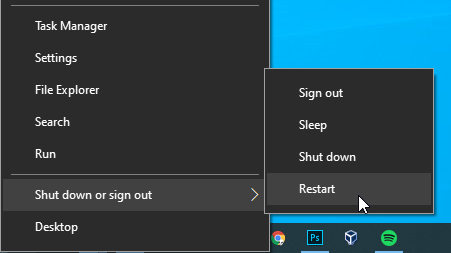
Your hard drive doesn’t require power to store your data. When you turn your PC off, your files are saved, ready for you to access again the next time you boot up. Your system memory is different. It’s volatile, which means that it needs constant electrical power to maintain its state. When you turn off your PC, all the data held in your system memory is wiped. That means that the quickest route to clearing your Windows memory cache is to just turn your PC off. Restart it or switch it off and boot it up again manually —either way, the brief interruption in power will erase the data held within. When Windows starts up again, your memory usage should be lower as a result. While it’s true that Windows 10 is far better at being left powered up than previous Windows releases, your data cache is going to grow the longer it runs without a restart. By occasionally rebooting your PC, you can quickly clear the cache in Windows 10 and give yourself an immediate speed boost.
Disable Windows Superfetch
Windows tries to improve system performance by analyzing how you use your PC and predicting your actions. Superfetch is a Windows feature designed to help this by automatically loading certain application data into your system memory. Technically, Windows treats Superfetch memory usage as a low priority. When demands on your system memory increase, Superfetch data should be given up. This process can be sluggish, however, especially if your memory usage is high and there’s a “tug of war” between Superfetch and your other open applications. If you’re using a solid-state drive as your Windows system drive, Windows will automatically disable this feature. It’s much quicker to access files on an SSD than a typical hard drive, so it’s safe to leave data on the drive to run directly instead, making Superfetch unnecessary. You’re probably safe to leave Superfetch on in most instances, but if you’re seeing regular slowdowns, high RAM usage, or a slow startup, disabling Superfetch could be a good place for you to begin troubleshooting.
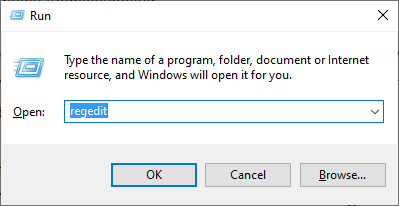
To start, open the Windows Registry Editor by pressing Win + R on your keyboard, type regedit, then press enter. Press Yes to the User Access Control window that appears.
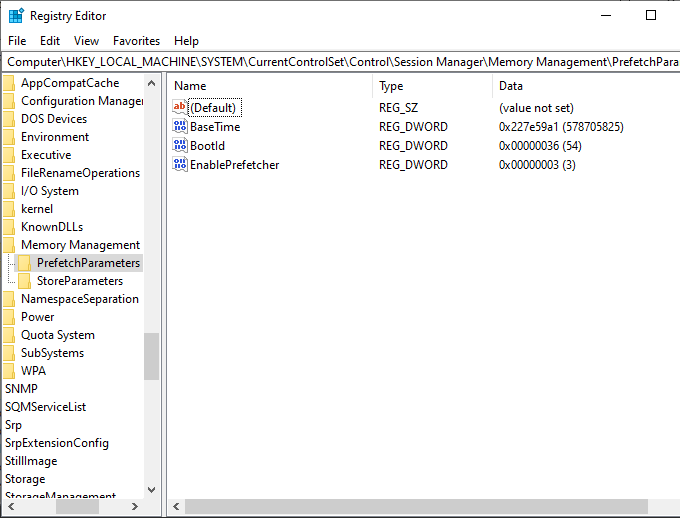
In the Registry Editor, navigate to HKLM\SYSTEM\CurrentControlSet\Control\Session Manager\Memory Management\PrefetchParameters in the left-hand panel.
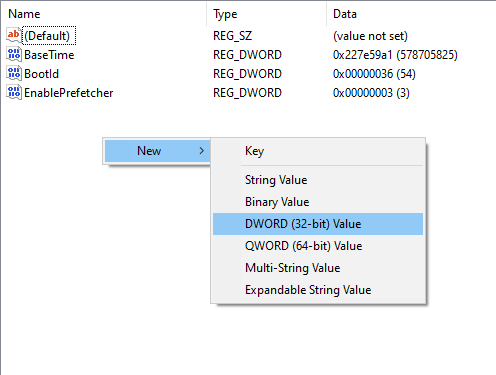
Right-click in the open window, go to the New sub-menu, then click D-WORD (32 bit) Value.
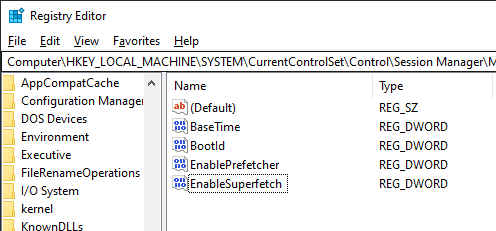
Name the new value EnableSuperfetch.
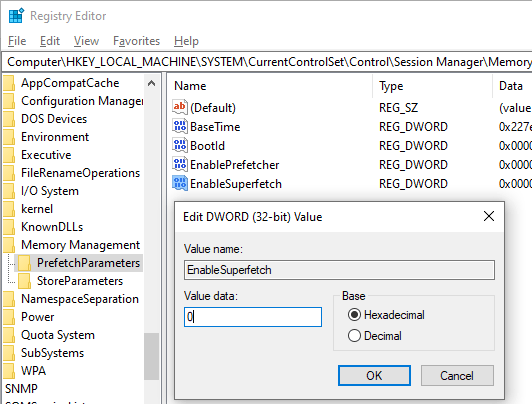
If you want to completely disable Superfetch, leave the value of EnableSuperfetch as 0. If you want to alter it, however, double-click on the EnableSuperfetch value, then under ValueData, change it to 1 to enable Superfetch for applications, 2 to enable it for booting, or 3 to completely enable it. Click OK to confirm the figure.
Once saved, reboot your PC.
This will disable the Superfetch service, either entirely, or by limiting its scope to applications or startup. As we’ve mentioned, users with an SSD system drive should have Superfetch disabled automatically and can look to one of the other methods to clear the cache in Windows 10 instead.
Clear Pending Idle Tasks to Free Up Memory
An old and commonly reported trick to clear your Windows cache is to use a custom shortcut that “should” clear the cache in Windows 10 and older Windows versions. Unfortunately, this doesn’t actually clear your Windows memory cache, but it does instruct Windows to begin processing pending system “idle” tasks. These are hidden Windows tasks that are performed in the background when system resources aren’t being used. The process may take some time to complete but could give you a longer-term boost in available system resources while your PC is running. This is an outdated method, but there’s certainly no harm in trying it if you’re trying to figure out how to clear your computer cache on the go. If you want an immediate boost in system performance, however, it’s best to just restart your PC instead.
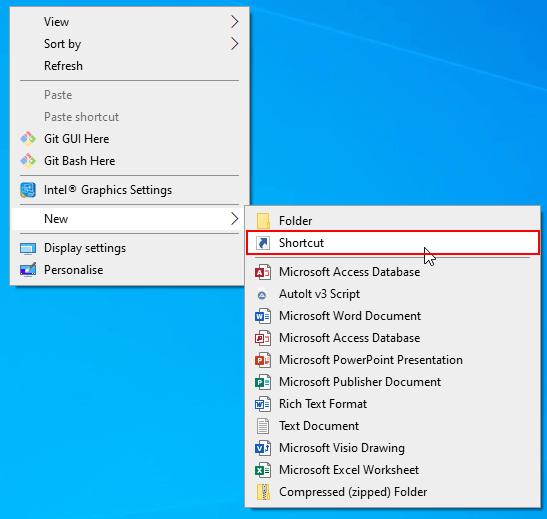
To begin, head to your desktop, or open Windows File Explorer in a suitable location. Right-click, head to the New sub-menu, then click Shortcut.
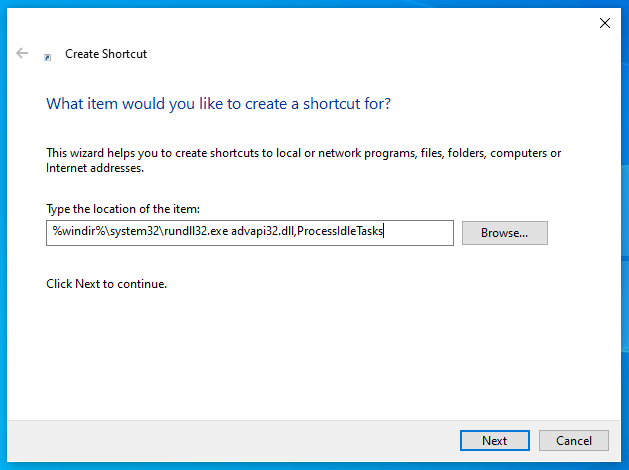
In the Create Shortcut dialog box, under Type the location of the item, type %windir%\system32\rundll32.exe advapi32.dll,ProcessIdleTasks, then click Next.
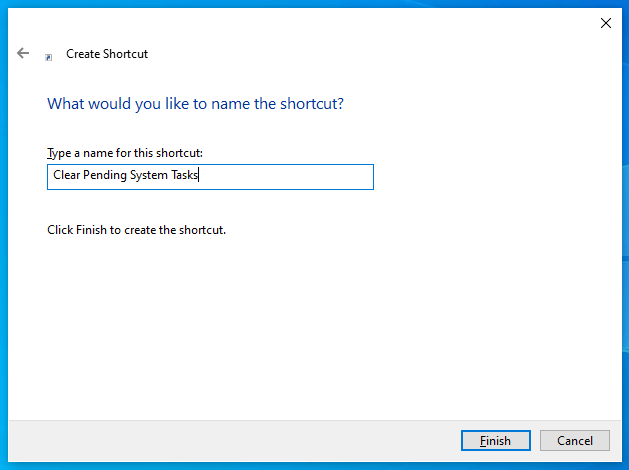
Give the shortcut a suitable name, such as Clear Pending System Tasks.
Click Finish to create the shortcut.
The shortcut will be ready for you to use once it’s created—double-click the shortcut at any point to begin the process.
Consider Other Solutions
Windows 10 is far better at managing available system resources than older Windows releases. If you’re seeing poor performance, try a restart in the first instance. This is the easiest way for you to wipe your Windows memory cache. The other methods we’ve listed could help, but they’re not guaranteed to work in every situation. Windows will try to manage your system resources as best it can, but a slow PC is likely to have a larger root cause such as insufficient RAM, low disk space, or an older and slower hard drive. Clearing your memory cache only patches up, rather than resolves, these longer-term issues with your PC. You may need to check your system performance to investigate the cause of any PC slowdown and to help you find a more adequate solution.
