The short answer is you can’t. However, if you turn it into a video it can be easily viewed by most people with an Internet connection. Another benefit of turning Powerpoint into a video is it is a great way to repurpose your content into another format. Video is quickly becoming a huge part of businesses’ digital marketing strategy. Even though Powerpoint is not marketed as a video tool, and there are many video tools, apps, and platforms available, you might be thinking why should you use Powerpoint? A few good reasons are:
As mentioned above, you can’t share your presentation with someone who doesn’t have Powerpoint installed on their computer.You have already spent a lot of time creating a fully automated Powerpoint presentation and don’t want to start from scratch with a video.Video creation is not in your arsenal of skills, and you don’t want to learn how to use a new tool.
The Quick & Easy Way
If your presentation is complete with automatic timings, transitions and animations, you might be shocked to learn how easy it is to convert it into a video.
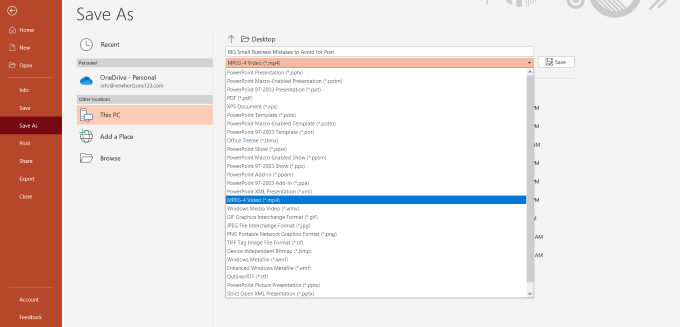
Open your Powerpoint presentation. Click on File, select Save As, and from the drop-down menu, choose MPEG-4 Video (*.mp4). (available in Powerpoint 2010 and above).
Too easy? It actually is. But keep in mind this only works for presentations that are already completely set up and ready to show to viewers.
Use The Export Option
Another way to convert to a video file is to click on File, choose Export, and click on Create a Video.
There are a few options for you to select that will affect how your final video turns out. Start by selecting quality.
The choice you make will affect the clarity, resolution, and video file size. The higher the quality, the larger the file. I generally use Full HD (1080p), but if you have a slow Internet upload speed or the file size is an issue, HD (720p) will also produce a high-res HD video.
Choose The Timings
The next option controls how long each slide stays on the screen or the timings of your video.
If you choose Don’t Use Recorded Timings and Narrations, each slide will be shown for the same amount of time. When you use this option, you can select the number of seconds you want each side to stay before moving onto the next one.
Now let’s click Create Video and save your file to your computer.
Find the location where you saved your video and play it. It will open in your default video player or app. The slides will play for the length of time you set above.You may wish to do this to allow viewers to read slides with longer text. This can be accomplished by choosing a different timing setting. Select Record Timings and Narrations.
This option enables you to customize how long each slide lasts on the video and gives you the option to record a voiceover. If you want to record a voiceover, you have several options. To change your microphone, look under settings.
You can also include a box of yourself recording the video by selecting the Camera option from the settings shown above.To start your voiceover, click on the red Record button. Powerpoint will give you a few seconds to get ready while it counts down 3, 2, 1.
While you are recording your voice, your Powerpoint is also recording the timings. The amount of time you spend on each slide before moving to the next will set the timing.To move to the next slide, use the arrow keys. When you get to the end, “X” out of the recording screen. You will then be taken back to the settings page with the timings you recorded.Click on Create Video and save it to your computer. Each slide in your video will now last as long as it took you to talk about it when recording.
How To Set Up Powerpoint Presentations With Transitions, Animations & Timings
If you would prefer to set the animations, timings, and transitions before creating the video, below are a few examples of how to do so. This way, you can use the quick and easy way to convert it into a video described above.
What Are Transitions?
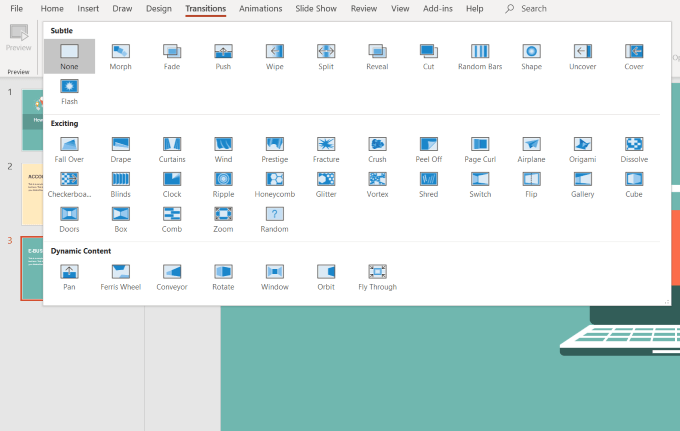
Have you ever seen a Powerpoint presentation that does something flashy or catches your eye between slides? Those special effects are called transitions. There are three categories of transitions you can choose to use in your presentation. They are:
Subtle: Basic and simple movement from one slide to another.Exciting: More elaborate and more interesting than subtle.Dynamic: When used between two slides that are similar in layout, this transition will only move the placeholders, not the slides.
When applied in moderation, transitions can add a professional and visually appealing effect to your presentation. If you use too many transitions, the results can be confusing, erratic, and distracting.
Apply a Transition
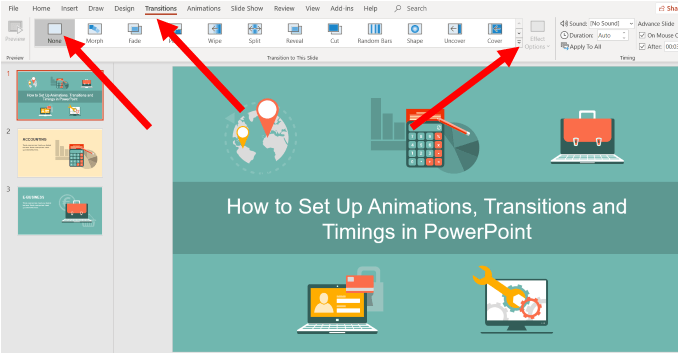
Select the slide from the Slide Navigation panel where you want to apply the transition. This slide will appear after the transition you choose.Click on Transitions from the top navigation. Note that the default is None. Click on More or the down arrow to see all the available options.
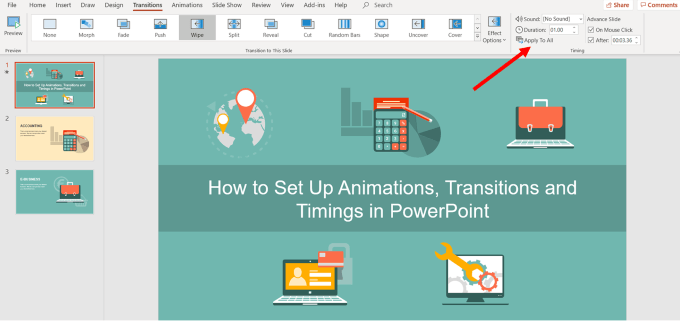
When you click a transition, you will automatically see a preview of what it will look like if selected. You can either use the transition for a single slide or click Apply to All to use the same transition for all the slides in your presentation.
Customize The Direction Of The Transition
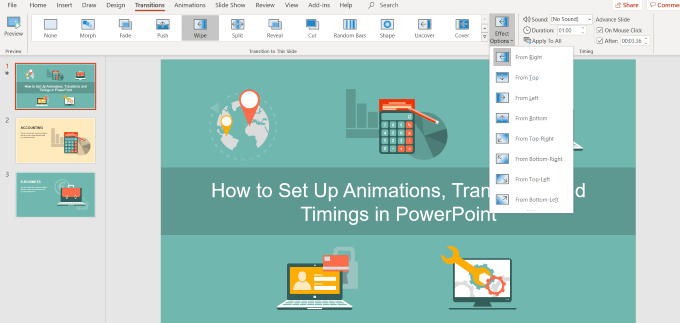
Each transition has different effect options.
To choose the one you want to use, click on Effect Options, select one, and watch Powerpoint automatically show you a preview of your selection.
Change The Duration Of a Transition
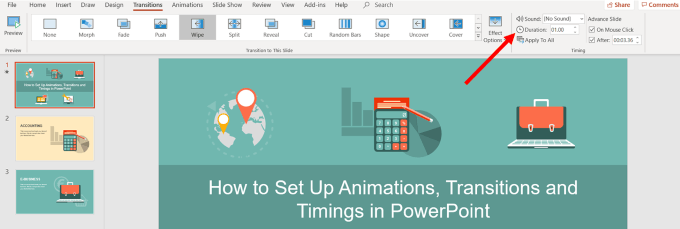
Choose the slide you want to change the time for and look for the Duration field. In this example, the side is set to 01.00.
Let’s increase the time to .025 to make the transition a little slower. You can choose to set the duration for the selected slide only.Click Apply to All to use the same transition duration for all the slides.
Add Sound To The Transition
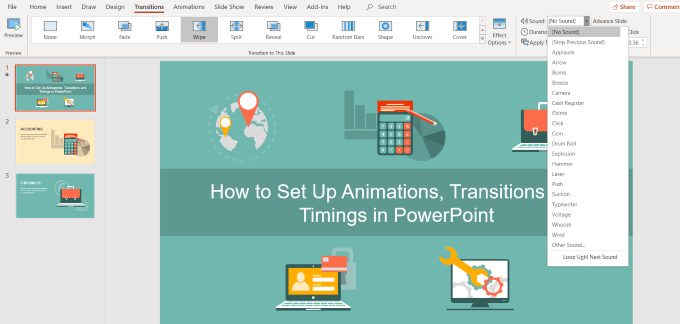
Click on the dropdown menu next to Sound from the top bar navigation. Choose a sound, then preview it.
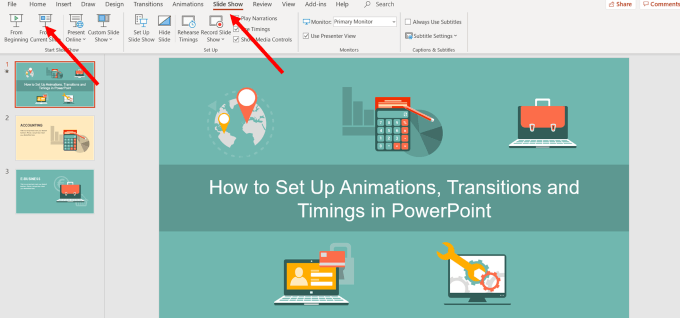
To preview the sounds, from the top bar navigation click Slide Show and then From Current Slide.
How To Move To The Next Slide
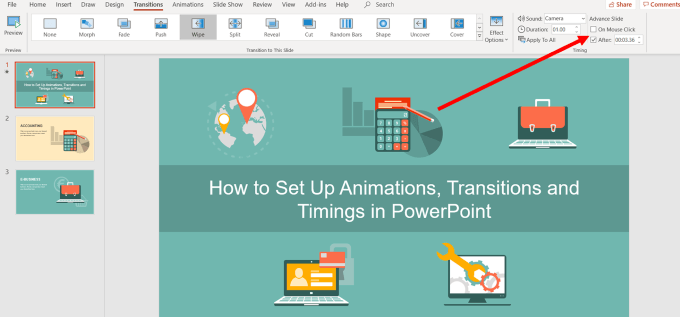
If you are doing a live presentation in front of an audience, you usually would press the spacebar or click your mouse to advance to the next slide. However, as we are converting the presentation to a video, you want to use the Advance Slides setting to automate the process.
Now you want to remove (deselect) the checkmark next to On Mouse Click. In the After field, enter the amount of time you want the slide to be displayed before moving onto the next one. In the example above, the slide will last 00:03.36.
Custom Animations
Animations in Powerpoint add motion to different elements in your presentation. The purpose is to draw attention to the key points, such as specific text, shapes, tables, images, and other objects. Using animations in Powerpoint videos makes it more engaging and exciting to watch. Some of the types of motion you can add to your slides are:
Changing the color or size of an image or text.Causing an image to appear or disappear.Moving an object around your slide.
Add An Animation
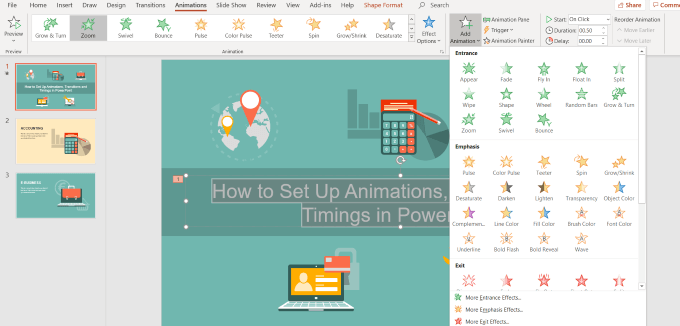
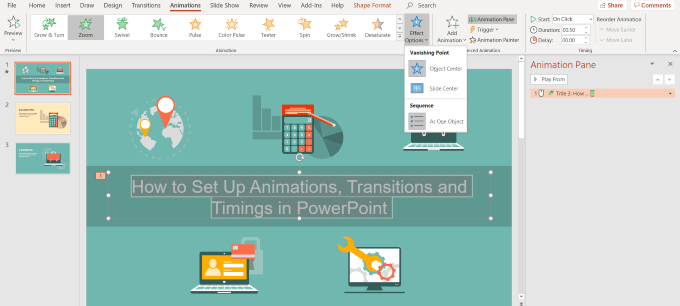
Start by selecting an object to animate, click on Animations, and choose an option. If you don’t see the Animation Pane, click on it to open it.
Now click on Effect Options and choose one. Different animations have different options.
To start an animation, click on the drop-down menu next to Start and choose from one of the options below:
On Click will start the animation when you click a slide.With Previous will start the animation at the same time as the previous animation on the previous slide.After Previous will play it immediately after the previous animation completes.
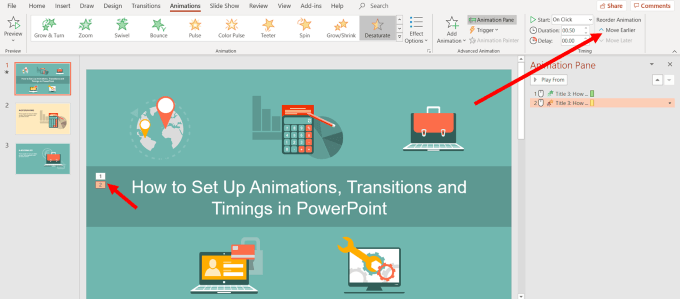
Click on Duration to set how long you want the animation to last. If you want to add a delay before an animation starts, use the Delay option. To add more effects, click on Add Animation and choose the one you want to use. If you want to change the order an animation appears on the slide, click on the animation marker.
Choose Move Earlier or Move Later to change the order the animation appears in the sequence.
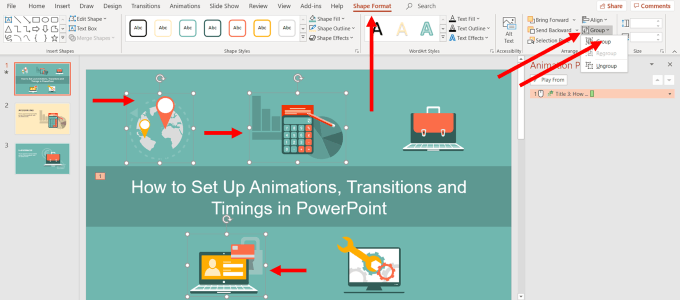
Add An Animation To a Group
Press control on your keyboard and select the objects you want to include in the group. Next click on Shape Format, then Group, and Group again.
Then select Animations and choose the one you want to use.
Animate Text
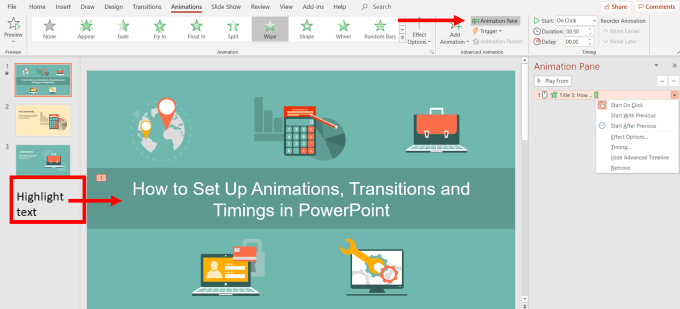
Highlight the text where you want to add an animation. Click Add Animation and choose an option. You will see it in the Animation Panel on the right side.
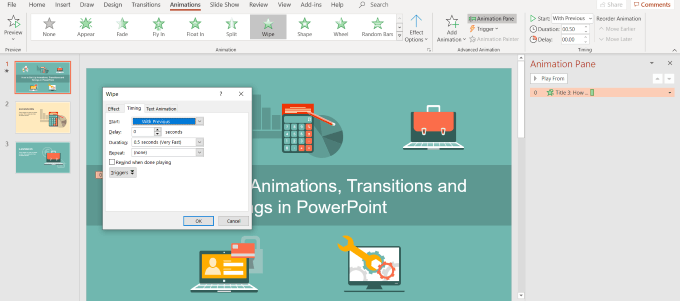
The next step is to click the drop-down menu next to the animation you just added. This is another place where you can decide when you want it to start. Choose from Start On Click, Start With Previous, or Start After Previous.Click the drop-down again next to the text animation, and this time select Effect Options.
Here is where you will set the direction, timing, and other specific animation options. There are a lot of special effects you can add to Powerpoint. With practice, you will be able to create an engaging presentation using automatic animations and transition timings. Once you are finished completing the above steps, you can use the simple way described at the beginning of this content to turn a Powerpoint presentation into a video. In just a few minutes, you will have a compelling, engaging, and visually appealing video to share with others.
